PHPのバージョンが変わっていますが、基本的には本記事に記載の手順でOKです。
RaspberryPiSBCやESP32などのマイコンを使うといろいろなデータを収集できますよね。これらのデータをどうやって保存していますか?
一番単純なのはCSV形式でネットワークストレージに保存してしまう方法です。これは後でテキストエディタで閲覧したり、編集するのが楽なので悪くないのですがデータの数や量が多くなると管理が難しくなるという問題があります。
そこで有用なのがSQLです。SQLはDBMS(データベース管理システム)で、簡単なコマンドでデータをデータベースに登録したり、条件に合ったデータを抜き出したりすることができるソフトウェアです。
ここでは、WEBサーバーシステムとしてNGINX、DBMSとしてMySQL(MariaDB)、SQLに登録したデータの管理ソフトウェアとしてPHPMyadminをRaspberryPi上に構築する方法を紹介します。
今回は上記環境の構築方法のみ紹介し、マイコンからのデータを受ける方法は次回紹介します。
検証環境
- RaspberryPi 3A
- RaspberryPi OS Lite 32bit Debian Bullseye 2023-05-03
- IPアドレスは192.168.0.121とする。(以下適宜読み替え)
上記の条件で検証をしています。バージョンが変わると手順・画面等が変わる可能性があります。
また、セキュリティ等については可能な限り対策を行っていますが、外部には公開しない、家庭内に設置するサーバーとして考えております。
一通りのセットアップ、apt update && upgradeなどは済ませた状態からスタートします。なお、私はemacsを使用していますが、エディタは何でも良いです。
手順
少し長くなりますが、初心者向けにインストール手順をワンステップづつ説明します。
NGINXとmaria-dbのインストール
まずはWEBサーバー(NGINX)とMySQL互換DBMS(MariaDB)をインストールします。
$sudo apt install -y nginx
$sudo apt install -y mariadb-server mariadb-client
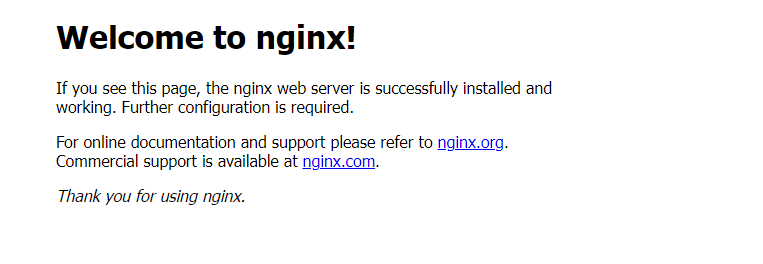
他のPCのウェブブラウザからhttp://192.168.0.121にアクセスして次の画面が表示されればNGINXのインストールはOKです。
MariaDBの動作確認は以下のコマンドを実行してください。
$sudo mariadb -V
mariadb Ver 15.1 Distrib 10.5.19-MariaDB, for debian-linux-gnueabihf (armv7l) using EditLine wrapper
SQLのセキュリティセットアップ
mysqlのセキュリティセットアップスクリプトを実行します。
$sudo mysql_secure_installation
これを実行するといくつか質問されますので以下を参考に操作してください。
NOTE: RUNNING ALL PARTS OF THIS SCRIPT IS RECOMMENDED FOR ALL MariaDB
SERVERS IN PRODUCTION USE! PLEASE READ EACH STEP CAREFULLY!

In order to log into MariaDB to secure it, we'll need the current
password for the root user. If you've just installed MariaDB, and
haven't set the root password yet, you should just press enter here.

Enter current password for root (enter for none):
OK, successfully used password, moving on...

Setting the root password or using the unix_socket ensures that nobody
can log into the MariaDB root user without the proper authorisation.

You already have your root account protected, so you can safely answer 'n'.

Switch to unix_socket authentication [Y/n] n
... skipping.

You already have your root account protected, so you can safely answer 'n'.

Change the root password? [Y/n] n
... skipping.

By default, a MariaDB installation has an anonymous user, allowing anyone
to log into MariaDB without having to have a user account created for
them. This is intended only for testing, and to make the installation
go a bit smoother. You should remove them before moving into a
production environment.

Remove anonymous users? [Y/n] Y
... Success!

Normally, root should only be allowed to connect from 'localhost'. This
ensures that someone cannot guess at the root password from the network.

Disallow root login remotely? [Y/n] Y
... Success!

By default, MariaDB comes with a database named 'test' that anyone can
access. This is also intended only for testing, and should be removed
before moving into a production environment.

Remove test database and access to it? [Y/n] Y
- Dropping test database...
... Success!
- Removing privileges on test database...
... Success!

Reloading the privilege tables will ensure that all changes made so far
will take effect immediately.

Reload privilege tables now? [Y/n] Y
... Success!

Cleaning up...

All done! If you've completed all of the above steps, your MariaDB
installation should now be secure.

Thanks for using MariaDB!
最初の質問は何も入力せずにエンター、続く2つの質問はn、残りはYでOKです。
PHPのインストール
以下のコマンドでPHPをインストールします。
$sudo apt install -y php php-fpm php-common php-mysql php-gd php-cli php-mbstring
エラーなくインストールが完了したら次のコマンドでPHPのバージョンを確認してください。
hoge@hogeserver:~ $ php -v
PHP 7.4.33 (cli) (built: Jun 9 2023 16:51:37) ( NTS )
Copyright (c) The PHP Group
Zend Engine v3.4.0, Copyright (c) Zend Technologies
with Zend OPcache v7.4.33, Copyright (c), by Zend Technologies
現状のRaspberryPiOS(2023-05-03)ではバージョンは7.4になるはずです。正しく動作しているか以下のコマンドで確認します。Active(Running)になっていればOKです。
$sudo systemctl status php7.4-fpm
RaspberryPiOS(Bookworm 2023/10現在)ではphpのバージョンが8.2となっていましたが、基本的な手順は同じようにすればOKです。バージョン番号等は適宜読み替えてください。
PHP-FPMの設定
nginxでPHPが動作するようにnginxの設定ファイルを書き換えます。エディタで設定ファイルを開き、PHPの記述から必要な部分のコメントアウトを外します。
$sudo emacs /etc/nginx/sites-available/default
(書き換え前)
 # Add index.php to the list if you are using PHP
index index.html index.htm index.nginx-debian.html;

~~~

 #location ~ \.php$ {
# include snippets/fastcgi-php.conf;
#
# # With php-fpm (or other unix sockets):
# fastcgi_pass unix:/run/php/php7.4-fpm.sock;
# # With php-cgi (or other tcp sockets):
# fastcgi_pass 127.0.0.1:9000;
#}
(書き換え後)
 # Add index.php to the list if you are using PHP
index index.php index.html index.htm index.nginx-debian.html;

~~~

 location ~ \.php$ {
  include snippets/fastcgi-php.conf;
  #
  # # With php-fpm (or other unix sockets):
  fastcgi_pass unix:/run/php/php7.4-fpm.sock;
  # # With php-cgi (or other tcp sockets):
  # fastcgi_pass 127.0.0.1:9000;
}
問題なく書き換えられているか確認します。”php7.4-fpm”の部分は先に確認したバージョンに合わせてください。
$sudo systemctl restart php7.4-fpm
$sudo systemctl status php7.4-fpm
$sudo systemctl restart nginx
$sudo systemctl status nginx
エラーが出ていなければOKです。エラーが出たらnginxの設定ファイルの書き換えをミスっている可能性が高いです。
PHPの動作確認
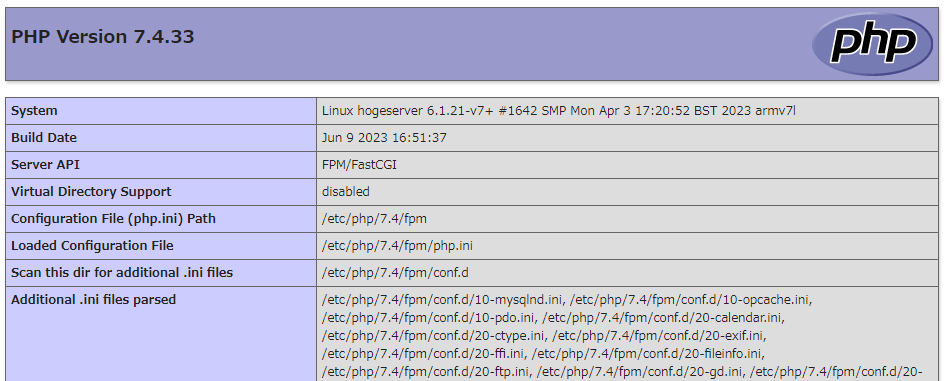
$sudo emacs /var/www/html/info.php
<?php
phpinfo();
?>
書き換え後、ブラウザでhttp://192.168.0.121/info.phpにアクセスして以下のような画面が表示されればPHPは問題なく動作しています。
apache2のアンインストール
$sudo apt purge apache2
$sudo reboot
PHPのインストールと一緒にapache2がインストールされてしまうようです。この場合はapache2を削除します。(nginxを使いたいので)
PHPMyadminのインストール(なくてもよい)
$sudo apt install -y phpmyadmin
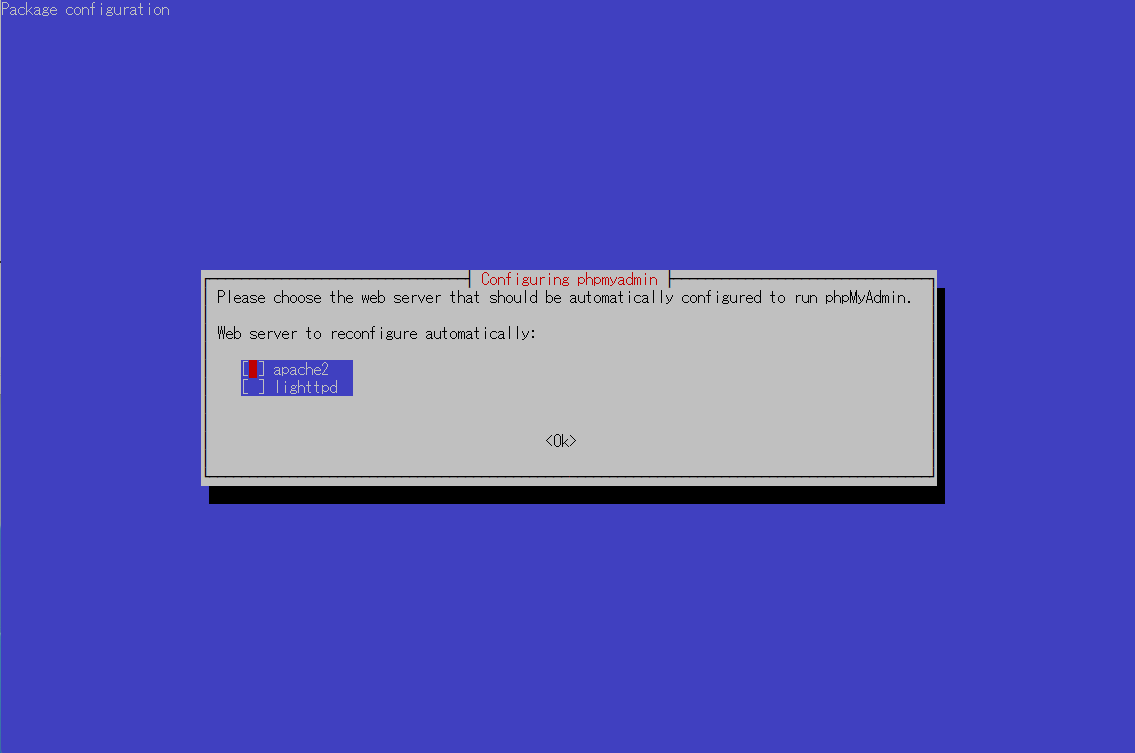
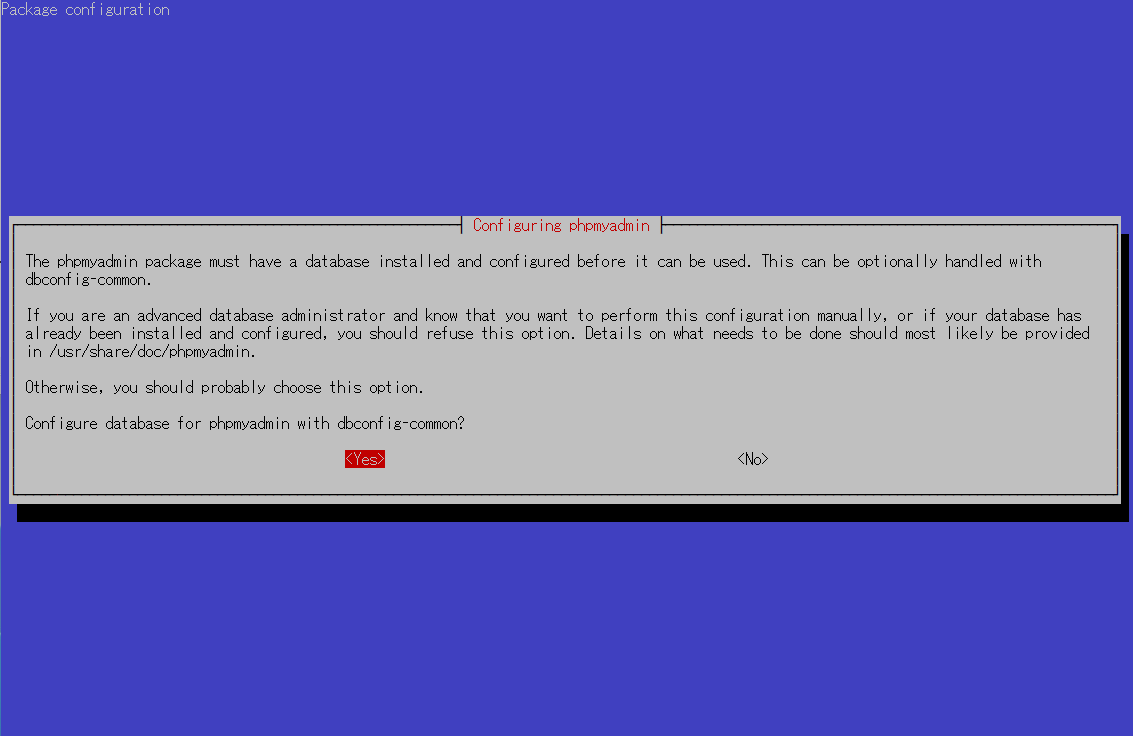
実行すると以下のようなウィザードが出てきますので、順に答えていきます。
webサーバーはnginxなのでどちらにもチェックをつけずにOKボタンを押します。
次はYES
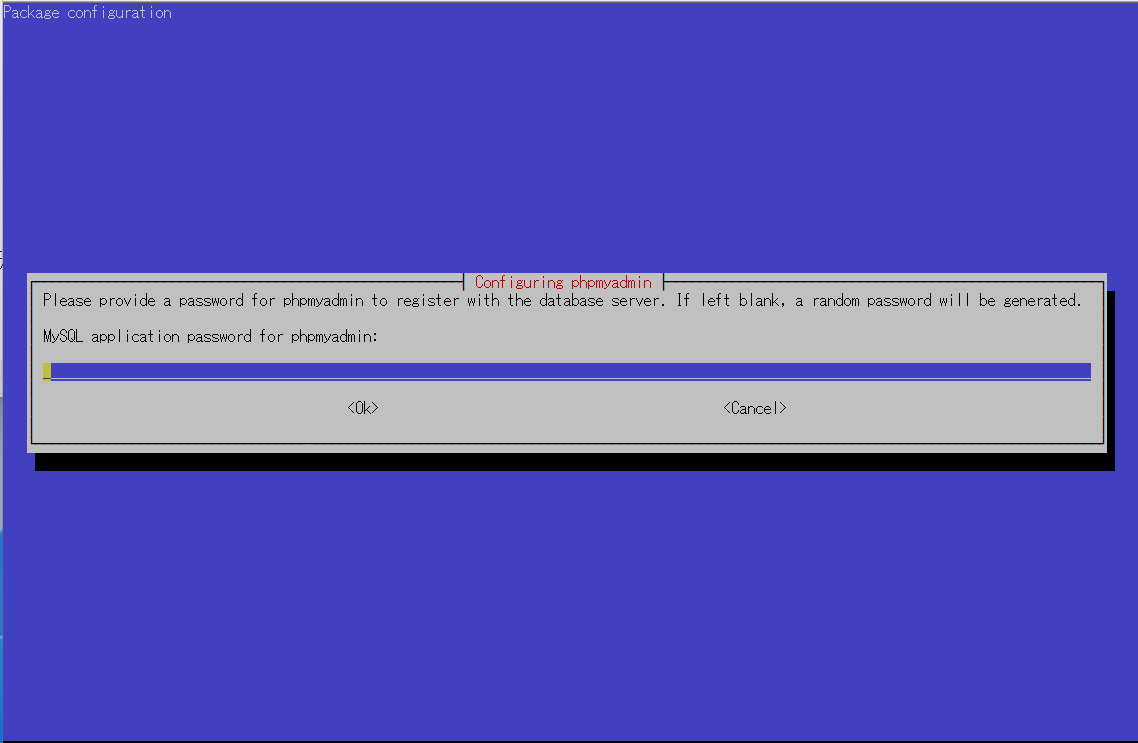
phpMyadminで使用するパスワードを設定します。後でphpMyadminにログインするときに必要になります。任意のパスワードを設定後Enter、再度聞かれるので同じパスワードを入力してEnterでOKです。

nginxのドキュメントルートにphpmyadminのリンクを張ります。
$sudo ln -s /usr/share/phpmyadmin /var/www/html/phpmyadmin
$sudo systemctl restart nginx
phpMyadminの動作確認
ブラウザで次のアドレスにアクセスします。http://192.168.0.121/phpmyadmin/index.php
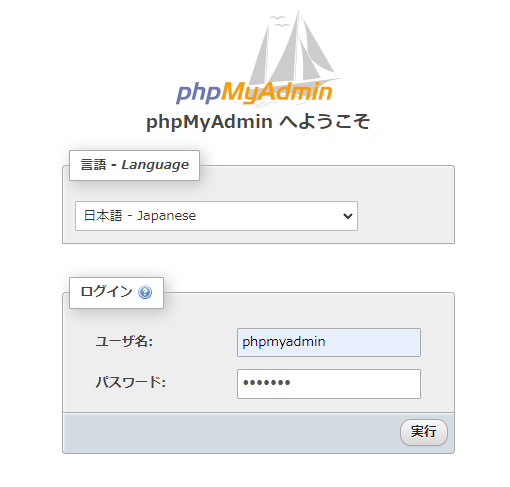
ユーザー名はphpmyadmin、パスワードは先ほど設定したものです。これでログインできればOKです。
ただし、このままではphpmyadminには権限がないためほとんどの操作ができません。phpmyadminにすべての権限を与えるのは以下のコマンドです。
$sudo mysql
>grant all privileges on *.* to 'phpmyadmin'@'localhost';
>exit
まとめ
いかがだったでしょうか。無事にインストールできたでしょうか?
手順通りにやれば問題なく環境構築できるはずです。
今回はただの環境構築ですが、次はマイコンなどからデータを登録する方法を紹介します。

コメント